Kubernetes
Kubectl commands
| Command | Description |
|---|---|
kubectl version | Check Kubernetes version |
kubectl cluster-info | View Cluster Information |
kubectl get all | Retrieve information about Kubernetes Pods, Deployments, Services , and more |
kubectl run [container-name] --image=[image-name] | Simple way to create a Deployment for a Pod |
kubectl port-forward [pod] [ports] | Forward a port to allow external access |
kubectl expose ... | Expose a port for a Deployment |
kubectl create [resource] | Create a resource |
kubectl apply [resource] | Create or modify a resource |
Aliasing kubectl to save on typing
PowerShell
Set-Alias -Name k -Value kubectl
Mac/Linux
alias k="kubectl"
Enable the Web UI Dashboard https://kubernetes.io/docs/tasks/access-application-cluster/web-ui-dashboard/
kubectl apply -f https://raw.githubusercontent.com/kubernetes/dashboard/v2.5.0/aio/deploy/recommended.yaml
kubectl describe secret -n kube-system
locate the kuberenets.io/service-account-token and copy the token
kubectl proxy
Visit the dashboard URL and login using the token
note kubectl proxy --port=8080
Pod Core Concepts
A pod is the basic execution unit of kubernetes application-the smallest and simplest unit in the kubernetes object model that you create or deploy. A collection of containers that can run on a host. You can run
kubectl explain podsto print out an explanation of the pod object.Act as an environment for containers. Its common for pods to contain only a single contaner but can include more than one.
Organize application "parts" into pods (server, caching, APIs, database, etc.)
Pod IP, memory, volumes, etc. shared across containers
Scale horizontally by adding Pod replicas
Pods live and die but never comeback to life
Pod containers share the same network namespace(share !P/port)
Pod containers have the same loopback network interface(localhost) so a container can communicate with other containers in the same pod through localhost.
Container processes need to bind to different ports within a pod
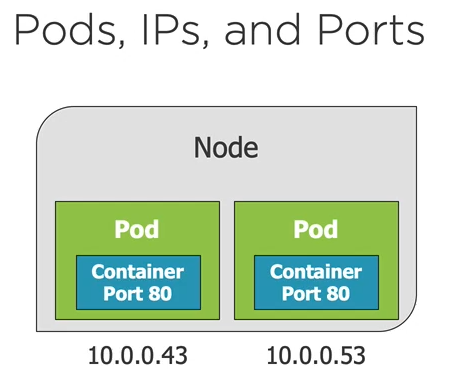
Ports can be reused by containers in separate pods
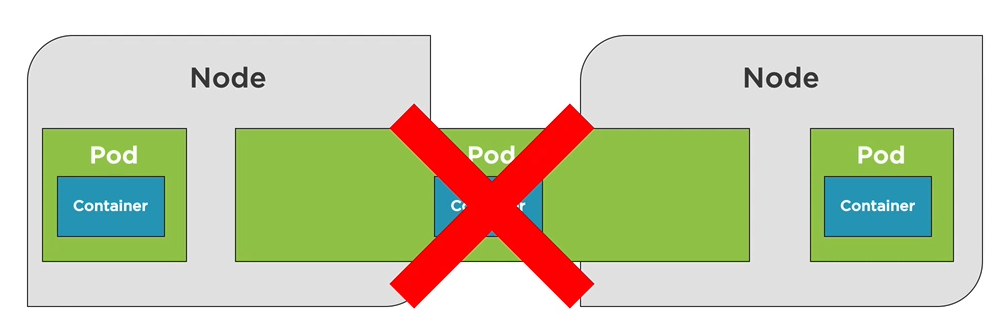
Pods do not span nodes. all the containers of a pod run on the same node.
NOTE: Run each process in its own container. A pod of containers allows you to run closely relates processes together and provide them with almost the same environment as if they were all running in a single container, while keeping them somewhat isolated.
Creating a Pod
Run the nginx alpine container inside of a pod
kubectl run [podname] --image=nginx:alpinekubectl create/apply command with a yaml fileWhen a node is brought to life , it gets a cluster ip address which is only exposed to the pods in a given cluster and not accessible outside the cluster.
kubectl port-forward [name-of-pod] 8080:80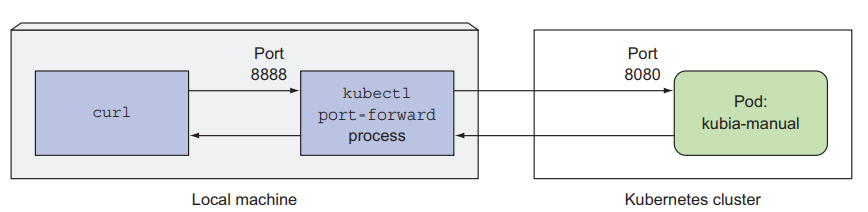
kubectl delete pod [name-of-pod]will cause pod to be recreated.kubectl get pod [name-of-pod] -o yamlretrieves the whole definition of a running podif you want to officially delete the pods, delete the deployment that scheduled the pod
kubectl delete deployment [name-of-deployment]kubectl get podsreturns list of podskubectl logs [name-of-pod]retrieves a pod's logkubectl logs [name-of-pod] -c [name-of-container]Retrieves logs of a given container in a multi container pod
Questions to ask in order to decide when to run multiple containers in a single pod or separate pods
- Do they need to be run together or can they run on different hosts?
- Do they represent a single whole or are they independent components?
- Must they be scaled together or individually
Note: A container shouldn't run multiple processes. A pod shouldn't contain multiple containers if they don't need to run on the same machine
YAML Fundamental
Composed of maps and lists
Indentation matters (be consistent)
Always use spaces not tabs
maps:
- name: value pairs
- Maps can contain other maps for more complex data structures
List:
sequence of items
key: value
complexMap:
    key1: value
    key2:
    subKey: value
items:
    - item1
    - item2
itemsMap:
    - map1: value
    map1Prop: value
    - map2: value
    map2Prop: value
YAML + kubectl = POD
apiVersion: v1
kind: Pod
metadata:
 name: my-nginx
spec:
 containers:
 - name: my-nginx
   image: nginx:alpine
   ports:
   - containerPort: 80
protocol: TCPapiVersion -- Kubernetes API version used in the YAML descriptor
Kind - specifies the type of kubernetes object / resource
Metadata - includes the name, namespace , labels and other information about the pod.
Spec - contains the actual description o fthe pod's contents , such as the pod's containers, volumes and other data.
Specifying the ports in the pod definition is informational and can be ommmited without any effect on the clients connecting to the pods
Perform a trial create and also validate the YAML
kubectl create -f file.pod.yml --dry-run --validate=trueCreate a pod from the YAML
- Will error if the pod already exists
kubectl create -f file.pod.yml
Alternative way to create or apply changes to a pod from a YAML
kubectl apply --file file.pod.yml
Use
--save-configwhen you want to usekubectl applyin the future .--save-configstores current properties in resource's annotationskubectl create -f file.pod.yml --save-configkubectl editorkubectl patchcan be used to make in place/non-disruptive changes to a pod
You can delete a pod using the file that created it
kubectl delete -f file.pod.yml
Organizing pods with labels
- As the number of pods increases, the need for categorizing them into subnets becomes more and more evident.Without a mechanisim for organisng them, you end up with a big incomprehenible mess.
- Each pod is labelled with two labels
- app, which specifies which app , component, or microservice the pod belongs to.
- rel, which shows whether the application running in the pod is a stable, beta or a canary release
- To list the pods with labels
kubectl get pods --show-labels - To list pods with a given lable
kubectl get pods -L [comma-separated-label-names] - To create a label
kubectl get pods [pod-name] [label-name] = [value] - To modify an existing label
kubectl get pods [pod-name] [label-name] = [value]--overwite
Defining a pod with YAML
apiVersion: v1
kind: Pod
metadata:
 name: my-nginx
 labels:
  app: nginx
  rel: stable
spec:
 containers:
 - name: my-nginx
   image: nginx:alpine
   ports:
   - containerPort: 80
kubectl create -f nginx.pod.yml --save-configkubectl get pod my-nginx --o yamlkubectl describe pod my-nginxkubectl apply -f nginx.pod.yml`
kubectl exec [pod-name[] -it shkubectl edit -f nginx.pod.ymlkubectl delete -f nginx.pod.yml
Pod Health
Kubernetes relies on Probes to determine the health of a Pod container
A probe is a diagnostic performed periodically by the kubelet on a container.
Types of probe
- Liveness probe
- Can be used to determine if a pod is healthy and running as expected
- When shoud a container restart
- kubernetes will periodically execute the probe and restart the container if the probe fails
- Readiness probe
- Can be used to determine if a pod should receive requests
- When sholuld a container start recieving traffic
- Liveness probe
Kubernetes can probe a container using one of the following mechanisms
- An HTTP Get probe performs an HTTP GET request on the container's IP address, a port and a path you specify if the probe receives a response and te response code doesn't represent an error.
- A TCP socket probe tries to open a TCP connection to the specified port of the container. If the connection is successfully established, the probe is successful.
- An Exec probe executes an arbitrary command inside the container and checks the command's exit status code. 0 implies the probe is successful.
Failed pod containers are recreated by default(restartPolicy defaults to Always)
Probes can have the following resutts
Success
Failure
Unknown
Liveness Probe
- You should always define a liveness probe for pods running in production to provide a way of knowing whether your app is still alive or not.
- A liveness probe should check if the server is responding, perform requests on a specific URL path '/health' and have the app perform an internal status check of all the vital components running inside of the app to ensure none of them has died or is unresponsive. Make sure the '/health' HTTP endpoint does not require authentication otherwise the probe will always fail causing your container to be restarted indefinitely.
- check only the internals of the app and nothing influenced by an external factor for example a frontend's webserver liveness probe shouldn't return a failure when the server can't connect to the backend database. Restarting the server will not fix the issue if the underlying cause is the database its self. The liveness probe will fail again and again, restarting the container repeatedly untill the database becomes accessible again.
- liveness probes shouldn't use too many computational resources and shouldn't take a too long to complete.
- Implementing a retry loop into the probe is wasted effort since kubernetes will always retry the probe several times before considering it a single failed attempt.Kubernetes always restarts the probe multiple times even when you declare a failure threshold of
apiVersion: v1
kind: Pod
metadata:
  name: my-nginx
  labels:
    app: nginx
    rel: stable
spec:
  containers:
  - name: my-nginx
    image: nginx:alpine
    resources:
      limits:
        memory: "128Mi" #128 MB
        cpu: "200m" #200 millicpu (.2 cpu or 20% of the cpu)
    ports:
    - containerPort: 80
    livenessProbe:
      httpGet:
        path: /index.html
        port: 80
      initialDelaySeconds: 15
      timeoutSeconds: 2 # Default is 1
      periodSeconds: 5 # Default is 10
      failureThreshold: 1 # Default is 3
    readinessProbe:
      httpGet:
        path: /index.html
        port: 80
      initialDelaySeconds: 3
      periodSeconds: 5 # Default is 10
      failureThreshold: 1 # Default is 3

# kubectl exec pod-name -c container-name -it /bin/sh
Deployment Core Concepts
Introduction
- ReplicaSets
- A ReplicaSet is a declarative way to manage pods
- ReplicaSets act as a Pod controller.
- Self-healing mechanism
- Ensure the requested number of pods are available
- Provide fault tolerance
- Can be used to scale pods
- Relies on a pod template
- No need to create Pods directly
- Used by deployments
- Deployment.
- A Deployment is a declarative way to manage Pods using a ReplicaSet
- Manages Pods
- Pods are managed using Replicasets
- Scales Replicasets, which scale pods
- Support zero-downtime updates by creating and destroying ReplicaSets
- Provides rollback functionality
- Creates a unique label that is assigned to the ReplicaSet and generated Pods
- YAML is very similar to a ReplicaSet
- What happens if a pod is destroyed?
- Deployments and ReplicaSets ensure Pods stay running and can be used to scale Pods
Creating a Deployment
kubectl and Deployments
kubectl create -f deployment.ymlkubectl create -f deployment.yml --save-configUse-save-configwhen you want to use kubectl apply in the futurekubectl apply -f deployment.ymlkubectl get deploymentskubectl get deployment --show-labelskubectl get deployment -l [deployment-label]kubectl get deployment -l app=nginx
kubectl delete deployment [depolyment-name]kubectl delete deployment -f[depolyment-file]kubectl scale deployment [deployment-name] --replicas=5- Scaling pods Horizontally - update
YAMLfile oruse kubectl scale commadn
- Scaling pods Horizontally - update
Deployment Options
Zero downtime deployments allow software updates to be deployed to production without impacting end users
Update an application's pods what impacting end users
Several options available
Rolling updates
Blue-green deployments
Canary deployments
- A canary release is when you deploy anew version of an application next to the stable version, and only let a small fraction of users hit the new version to see how it behaves before rolling it out to all users. This prevents bad releases from being exposed to too many users.
Rollbacks
Services
Services Core Concepts
A service provides a single point of entry for accessing one or more Pods
Since Pods live and die, can you rely on their IP?
The life of a Pod
- Pods are "mortal" and may only live a short time (ephemeral)
- You can't rely on a Pod IP address staying the same
- Pods can be horizontally scalled so each Pod gets its own IP address
- A pod gets an IP address after it has been scheduled (no way for clients to know IP ahead of time)
Services abstract Pod IP addressed from consumers
Load balances between pods
Relies on labesl to associate a service wtth a pod
Node's kube-proxy creates a virtual IP for services
Layer 4(TCP/UDP over IP)
Services are not ephemeral
Creates endpoints which sit between a service and pod
Service Types
- Cluster IP -
- Expose the service on cluster-internal IP(default) within the cluster
- Only pods within the cluster can talk to the service
- allows pods to talk other pods
- NodePort
- Expose the service on each Node's IP at a static port
- Allocates a port from a range (default is 30000 -32767)
- Each Node proxies the allocated port
- LoadBalancer
- Provision an external IP to act as a load balancer for the service
- NodePort and ClusterIP services are created
- Each Node proxies the allocated port
- ExternalName
- Maps a service to a DNS name
- Acts as an alias for an external service
- Allows a service to act as the proxy for an external service
- External service details are hidden from cluster (easier to change)
Creating a Service with kubectl
- Port Forwarding
- How can you access a pod from outside of kubernetes?
- Use the kubectl port-forward to forward a local port to a Pod port
kubectl port-forward pod/[pod-name] [external-port]:[internal-port]kubectl port-forward deployment/[deployment-name] [external-port]:[internal-port]kubectl port-forward service/[service-name] [external-port]:[internal-port]
- Use the kubectl port-forward to forward a local port to a Pod port
- How can you access a pod from outside of kubernetes?